Azure AD MyApps Collections | Organize your applications

Introduction

Microsoft released a new feature for Azure AD MyApps called Collections. It’s been in public preview for a little while but has released as general availability for the February identity updates. As they indicate in this article, “With the general availability of user-based collections in Azure AD My Apps, users can now create and manage their own personalized app collections while freeing IT resources and time for other tasks.”

Challenges

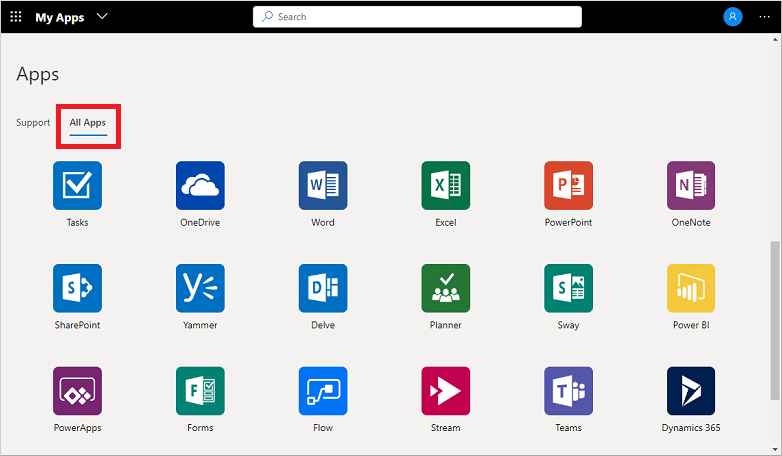
If you are on the journey of a password-less solution like the Microsoft MyApps portal to organize your enterprise applications into a Single Sign-On solution it’s common to have “app overload.” Our organization has 100+ apps now configured, with so many our users continue to ask about a way to hide or organize them. Microsoft doesn’t offer a way for users to do this, there is a way for Administrators to publish Collections to users but it is limited in its features. With the new user based collections anyone can do it themselves. Let’s take a look!

Organize your applications

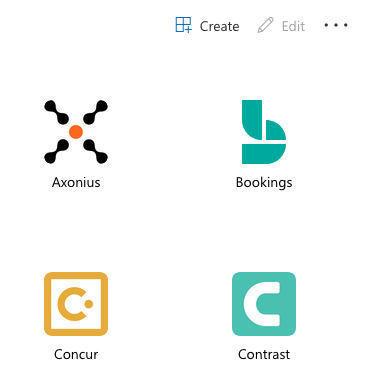
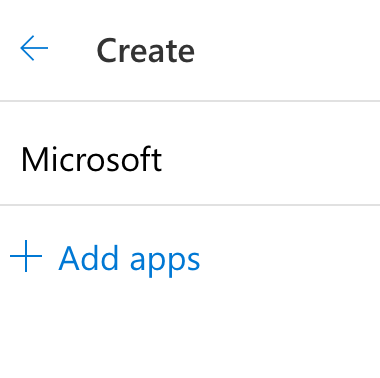
  1. Click on the Create button to give your Collection a name.
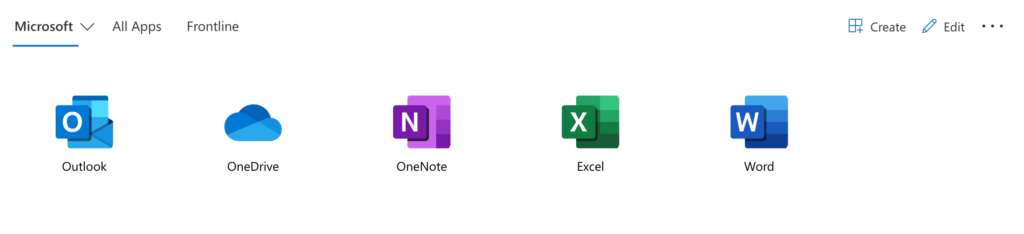
  2. Let’s add some of our Microsoft applications, you can drag and drop them in order, then click Create.
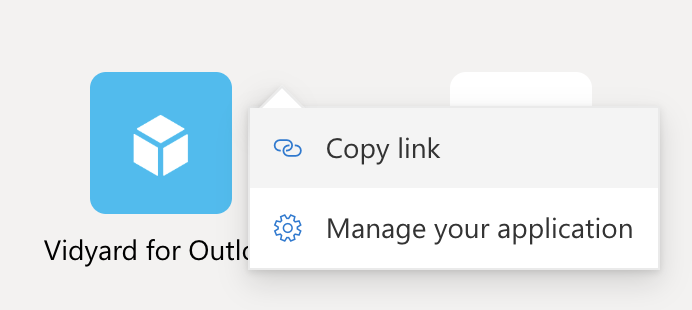
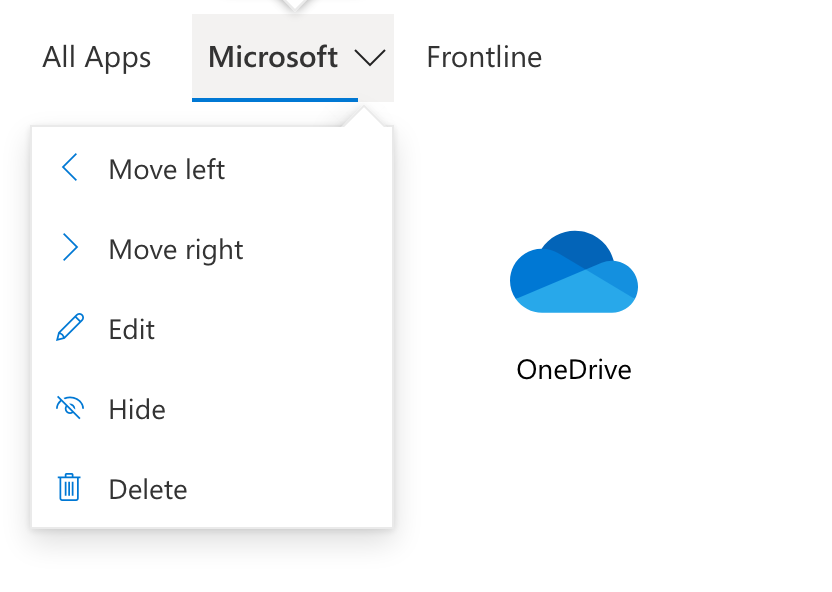
  3. Now you will see your new Collection. You can click the down arrow next to the Collection to make changes.
  4. Enjoy your new Collection!
Azure AD MyApps Collections

Conclusion

This new Azure AD MyApps Collections experience is a much needed update for Microsoft. Organizing applications into different collections is a feature many other Identity solutions provide. If you haven’t started a password-less journey yet with a solutions like Single Sign-on you are missing out! Your users will rejoice with even a few applications that they don’t need to remember a username or password for. Take a look at a few other articles I have posted on MyApps and Single Sign-on.

Azure AD MyApps Portal

Introduction

Have you made the move to consolidating user access to a single sign-on (SSO) portal yet? If Active Directory is your primary source for user access, the Azure AD MyApps portal is a great place to start consolidating your access. For the sake of time I’m going to jump right into some ways to customize this portal, if you need more information on moving to SSO, take a quick read here.

Azure AD MyApps Portal

The new portal released general availability in 2020-Q1, it has a nice new feel and the Microsoft AzureAD Identity team has boasted a lot more features to come. To start, update to the new MyApps experience and try to create collections of apps. This could be a great way to group them together based on a security group for Client Success, Development, Sales, etc. I sure hope more features keep coming for it like Compact View, Pinned Apps, or a Frequently Used tab. You can go to their UserVoice page to submit new ideas or vote on current ones.

Clean up the portal

One big issue I’ve seen with Azure AD MyApps Portal is that it will start adding icons for apps you don’t want to see. For example, if you deploy an Outlook Add-In or oAuth for an app service it will now show for your users in their portal. When you click on it there will be an error or take you to a unexpected location. Well let’s clean that up! Here’s a few steps to do it:

  1. We’re going to take a look at this VidYard app – click the 3 stacked dots and then Copy link
  2. Now paste that link somewhere to inspect it. You will see a long string, you want the Enterprise App ID found after the name and before the Tenant ID. Use that ID to search for the app in Enterprise Apps in Azure AD.
  3. Now go to Properties and switch the Visible to users to No
  4. That’s it! Users can still authenticate to this app but won’t clutter up their MyApps portal. (I’ve seen it take about 10 minutes to be hidden)

Powershell process

So now that we went over the easy way to do it, let’s take a deeper dive into a way to do this in a bulk method. Also, if the app doesn’t show in your portal doesn’t mean it’s not showing for others. You can use the method for all apps in Azure AD. One disclaimer, some apps can not be hidden (specifically Microsoft apps). Microsoft has documentation on hiding applications here.

  1. First connect to Azure AD > then get all Service Principal Names
  2. Or if you want to search for a specific one use -SearchString zoom
  3. What you need is the ObjectID (you can also get this from the UI version of the portal for any Enterprise Application)
  4. Now use the last few lines to actually hide the app – a great example are the “App for Outlook” add-ins you can deploy to all users. There is no reason to have this show in the MyApps portal – clean that up for your users after you deploy it!
Connect-AzureAD
Get-AzureADServicePrincipal | Sort DisplayName 

ObjectId                             AppId                                DisplayName                       
--------                             -----                                -----------                       
01c9b439-a0c4-4e5b-a4c9-XXX123XXX456 f0ae4899-d877-4d3c-ae25-XXX123XXX456 AAD App Management                
0bd5a26c-8889-44b6-870a-XXX123XXX456 4e9b8b9a-1001-4017-8dd1-XXX123XXX456 Adobe Acrobat                     
20446487-87cf-4ddf-bed9-XXX123XXX456 00000013-0000-0000-c000-XXX123XXX456 Azure Classic Portal

Get-AzureADServicePrincipal -SearchString zoom

ObjectId                             AppId                                DisplayName     
--------                             -----                                -----------     
e3d65048-e393-48ff-9ac9-XXX123XXX456 fc108d3f-543d-4374-bbff-XXX123XXX456 Zoom            
1e5366dd-39d4-44ea-XXX123XXX456 d835d24c-a73d-44fe-af63-XXX123XXX456 Zoom            
eb61dc02-64e1-4b8a-XXX123XXX456 15151540-1838-48ac-bb91-XXX123XXX456 Zoom for Outlook 

$objectId = "eb61dc02-64e1-4b8a-XXX123XXX456"
$servicePrincipal = Get-AzureADServicePrincipal -ObjectId $objectId
$tags = $servicePrincipal.tags
$tags.Add("HideApp")
Set-AzureADServicePrincipal -ObjectId $objectId -Tags $tags

Conclusion

Keep your Azure AD MyApps portal cleaned up for your users before they go crazy with so many icons. It would be great if Microsoft would start adding new features to keep down on the clutter, but until then you can do your part. If you’re moving your users to the MyApps portal for all your SaaS apps, this is a must keep their sanity. Check out more features of Office 365 and Azure Active Directory with these links.

Stop users from auto-forwarding email to external users

exchange online admin center

Introduction

Have you run a report to see if users have setup Outlook rules to auto-forward email to an external email like their personal email? I was blown away after running a report to find multiple users who had a generic rule to forward their email to their personal email. If you’re concerned about data loss this is a big issue, let’s take a look at how to stop users from auto-forwarding email to external users.

Find out who is auto-forwarding

Take a look below at a way to setup a Mail Flow rule in the Exchange Admin Center to start blocking message type of auto-forward. You will want to use the following for:

Apply this rule if:

  • The sender is located: Inside the organization
  • The recipient is located: Outside the organization
  • The message type is: Auto-forward

Do the following:

  • Reject the message with the explanation: <Use your own custom explanation for users to see.
  • Generate incident report and send it to: <email address>

Except if:

  • The recipient address includes: <add any exceptions here to still allow>

Finally choose to “Test with (or without) Policy Tips” – what this will do is start testing the rule. You will want to be sure you have added an option to send incident reports so that you can find out who is abusing this auto-forwarding rule. When you’re ready, you will change the mode to Enforce as detailed in the screenshot above.

Removing the option to Forward

There is a place in the Outlook settings that you can remove for auto-forwarding email. If you are using this for service or shared mailboxes you will want to make any forwarding changes in the Exchange admin center, not at the user level. Microsoft has documented this process, you can follow these steps in Turning off forwarding in Exchange Online. Those steps are for making a change at the user level, I would recommend making a change at the tenant level so all current and future users will have this option removed.
First you will need to run 2 commands in PowerShell:

New-ManagementRole -Parent MyBaseOptions -Name MyBaseOptionsNewDefault

Set-ManagementRoleEntry MyBaseOptionsFrontlineDefault\Set-Mailbox -
Parameters DeliverToMailboxAndForward,ForwardingAddress,ForwardingSmtpAddress -RemoveParameter

Once this is complete you will see a new option in your Exchange Admin Center > Permissions > User roles > Default Role Assignment Policy (you may have more policies). Now open up that policy and check the box next to the “MyBaseOptionsNewDefault” that you created in PowerShell.

Here is a before and after of what it will now look like in the Outlook web app under Settings > Mail > Forwarding (option is completely removed):

Conclusion

I hope this gives you guidance on how to stop users from auto-forwarding email to external users. The first step was to put up a wall with a Mail Flow rule so they can’t setup any forwarding rules. The second step was to remove the option in the Outlook user interface for forwarding all email. Users can still forward emails one at a time, but now there shouldn’t be any way they are doing it with auto-forwarding. If you liked this, be sure to see other tips in the Office 365 category.

Protect email from foreign countries with Exchange Online

exchange online admin center
Exchange Online Admin Center

Introduction

A common way to stop security threats for your users would be to protect email from foreign countries. If you do business internationally keep in mind you will want to be sure those countries are not blocked. I’ve blocked most international country codes in Exchange Online since our company only works domestically. Recently we’ve started working with off shore teams though so I needed to take a closer look at how this all works.

Protect email from foreign countries

Go to the Exchange Admin Center > Protection > spam filter. Under international spam you will see languages and countries. If you click the + sign you will find a whole list you can select (hold down Shift or Control button to select a range to add). Click Save and away you go, you are now have a way to protect email from foreign countries or languages.

Troubleshooting

If you haven’t inspected an email header before, now is a good time to do some reading. Here is a good article from Microsoft on just about everything for anti-spam message headers. Microsoft also has a Message Header Analyzer to help you break down everything in a more readable format.

Solution

Since we started working with users internationally with their own email servers we needed to come up with a way to be sure their emails weren’t going to be marked as spam. I didn’t want to just remove the entire country they worked in since it was known as a large source of spam. Also they’re email system could change and start to come from another country next door. So I tested if we added the domain to our Allow List if it would overrule any kind of country setting we had. It did! If you add a domain to your spam allow list it will deliver even though you are blocking that international country code. See my article Tips with Office 365 Email Safe Senders if you haven’t worked with that setting before.

Conclusion

This is a very quick way to help protect email from foreign countries. It’s an easy hole to plug pretty quickly, you can always be more aggressive at first then start to pull back as your user’s report the need to communicate internationally. The emails will land in your Quarantine, they won’t be blocked completely.

Email Migrations to Office 365 | Lessons Learned

I’m back! I’ve been away for the past few months focused on email migrations for a few companies that we’ve recently acquired. I wanted to post a few lessons learned from what I’ve recently learned on email migrations. I’ve done close to 20 acquisitions in my career, still not an expert but some may say I’m smarter than the average bear.

MigrationWiz by BitTitan

Using a migration tool is highly suggested! It’s going to cost some money but this software is worth it. In most cases if you want to migrate both email and documents it’s going to cost you around $15 per user. It’s not going to be free, but it won’t break the bank either. I’ve used MigraitonWiz for years now, there’s still my go to because of the simplicity and price.

Export Everything

I’ve worked with technical staff in most acquisitions, but very few have good backups and understanding on how everything works. Do as much exporting of properties you can to keep around for when something doesn’t work after the migration. I’ve gone to these almost every time to find an email address or forwarding rule that couldn’t remember how it worked.

DNS Updates

Be prepared and start updating DNS before the migration. I’ve been surprised to find MX records with 1 day TTLs. This doesn’t always represent how long it will take to update DNS when you are ready to cutover from one email system to another, but the shorter you can reduce these the less time you will be waiting around on migration night.

Office 365

I’ve been managing Office 365 and Exchange Online since 2015, there’s still plenty to learn for migrating. If you are doing a tenant to tenant migration, get your scripts ready! You will need to change all userPrincipalNames and Primary Email Addresses to the default .onmicrosoft.com domain before you can start removing email addresses. You will need to do that because you can’t remove a domain from a tenant to verify in another tenant until they are all gone. And I mean, all gone. Which brings me back to my second point, be sure you export everything first before you start deleting 😉

Last thoughts on email migrations

There’s a lot of work that goes into email migrations but the more time you spend ahead of a migration the less time it will require after you migrate. Hope these few tips will help you in your next migration. See more tips on Office 365 here.

Remove all Office 365 licenses for a user

Introduction to Licensing

A common task for Microsoft Office 365 Administrators is to remove all Office 365 licenses for a user. There is no “one click” button in the Admin Center to do this. It’s also very time consuming if you have a list of users you need to do this for. I’m going to go over a few pre-requisites you will want to review, then show you a quick way to do this with PowerShell.

There are a few ways to connect to Office 365 from PowerShell, I’m going to use the Azure Active Directory Module. Let’s review what licenses you have access to, and also the services associated with each license.

#Connect
Connect-MsolService

#Get all licenses
Get-MsolAccountSku

#Get specific service details for a license
(Get-MsolAccountSku | where {$_.AccountSkuId -eq "litwareinc:ENTERPRISEPACK"}).ServiceStatus


Review User’s Current Licenses

#Create a CSV formatted file with the following in the first row:
userPrincipalName
user1@litwareinc.com
user2@litwareinc.com
user3@litwareinc.com

#Import the users and find out what they're licensed for
Import-Csv C:\Scripts\_Import_UPN.csv | %{get-msoluser -userprincipalname $_.userprincipalname } | FT DisplayName,*licenses* -AutoSize


Remove Licenses

So now that we have some information about our users let’s understand what will happen when a license is removed. Since Office 365 is a service related subscription when a license is removed they will lose access completely. Also as an Admin, or if another licensed user had access in some way will also be lost. The data will be complete removed after so many days Please review Microsoft’s documentation on Retention. You will want to backup the data before removing the license to ensure the data is not lost. When a license is removed the mailbox will be soft deleted for 30 days, then removed completely. For OneDrive, you can configure the maximum value up to 10 years so you have a little more time for cleanup. So for the fun part, here is a quick script to clean up all the licenses for a list of users:

#This requires a CSV of your user's as detailed previously
$csvFileLocation = "C:\Scripts\_Import_UPN.csv"
$users = Import-Csv -Path $csvFileLocation
foreach ($user in $users) {
$upn = $user.'UserPrincipalName'
(get-MsolUser -UserPrincipalName $upn).licenses.AccountSkuId |
foreach{
Set-MsolUserLicense -UserPrincipalName $upn -RemoveLicenses $_}}


There you have it, when you remove all licenses for a user it will really help keep things up to date. Now run the script to get all the user’s licenses again to review if they have been cleaned up. Hope this helps keeps your access cleaned up and costs down.

Create a List in Office 365 for Email reminders

Overview

Have you missed an item that needed renewed and caused the whole world to crash down? OK, maybe not the whole word but I’m sure you’ve felt the stress of, “Oh no, that certificate just expired and everyone is getting warned it’s an unsafe site!” Over the years I’ve heard lots of well intended ideas by people, “Let’s keep all of these in your IT asset management system, or you can use our contract system, or enter it as a financial renewal in our ERP system.” Time and time again, those are very cumbersome and expensive when all I needed was a simple list that could email my a notification. Say no more, let’s create a list in Office 365 and a Flow to get email alerts.

Setup

If you haven’t used an Office 365 Group yet it’s a collection of collaboration services all tied to a single group of people. All the permissions are set at the Group level and all users get access to things like a Shared Mailbox with email address, OneDrive document library, SharePoint site, etc. Let’s create a list and customize for what we want to keep track of.

  1. Create an Office 365 Group or go to an existing Group you have access to.
  2. Go to SharePoint app to see your Group – Click the New dropdown >
  3. Create a List
  4. Customize your list – add items – organize columns – etc.
  5. Add an item to your list

There you go! Now once you have an item added you can click the Flow drop down and you should see Set a reminder > Date Due. Since I added a column with a date, SharePoint was smart enough to create a built in Flow for a reminder based on the due date.

Summary

That’s it! Now sit back and wait for the reminders to renew your items. Flow is a built in app from Microsoft that can be used all over Office 365. Create a list in Office 365 is just one quick example of what it can do. Learn more about Flow here.

So why Office 365 and Lists? If you use Microsoft Office 365 for all of your core business collaboration solutions then it’s probably never going away. Seems like a pretty simple solution to me. Give it a try and let me know how it goes or if you any other tips.

Tips with Office 365 Email Safe Senders

Introduction

Recently I’ve had trouble with email safe senders for a domain in our Office 365 Exchange environment. Let’s take a look at some tips with Office 365 email safe senders. Usually my first place to go is the Exchange Admin Center. Now go to Protection > Spam filter > Allow lists – Add the sender/domain you want to allow. Here is Microsoft’s documentation: Create organization-wide safe sender or blocked sender lists in Office 365

Typically this is the resolution, the emails will arrive in any user’s mailbox after this. However, this was not my case this time. I went to the client side of equation to try there.

Tips with Office 365 Safe Senders

Here are few PowerShell methods to review and set rules for a user.
This will display all of the emails/domains the user has set as a trusted sender.

Get-MailboxJunkEmailConfiguration -Identity "ALIAS" | Select -ExpandProperty TrustedSendersAndDomains | Sort

In order to add a new email/domain use the following to add a truster sender:

Set-MailboxJunkEmailConfiguration -Identity "ALIAS" -TrustedSendersAndDomains @{Add="contoso.com"}

You can comma separate the emails/domains if you have multiple to add. In addition, you can edit the Blocked Senders with a similar method:

Set-MailboxJunkEmailConfiguration -Identity "ALIAS" -BlockedSendersAndDomains @{Add="contoso.com"}

Set-MailboxJunkEmailConfiguration -Identity "ALIAS" -BlockedSendersAndDomains @{Add="contoso.com","contoso.com"}

Conclusion

Hope these tips with Office 365 email safe senders will help for your users. Much more can be found with Microsoft’s Documentation for Set-MailboxJunkEmailConfiguration. You can also see more about posts for Office 365 here.